Cara Membuat Text Editor Di Python Dengan Library PySide
Desember 10, 2017
Add Comment
Pada tutorial kali ini, saya akan membagikan contoh coding untuk membuat text editor di Python dengan library PySide.
Apa PySide itu ?
PySide adalah library Python lintas-platform yang dapat digunakan untuk membangun aplikasi GUI dengan memanfaatkan Qt Framework.
Untuk instalasi PySide, baik di Windows, Mac OS maupun Linux silakan cek di https://pypi.python.org/pypi/PySide/1.2.4#installation.
Atau jika masih belum berhasil mengintal PySide, temen-temen bisa mengikuti langkah-langkah mudah mengintal PySide berikut ini:
Apabila PySide sudah terinstal, maka temen-temen dapat melanjutkan tutorial ini.
Oke, berikut ini adalah contoh coding untuk membuat text editor di Python dengan library PySide.
texteditor.py
note: copy dan simpan code di atas dengan ekstensi nama_project.py.
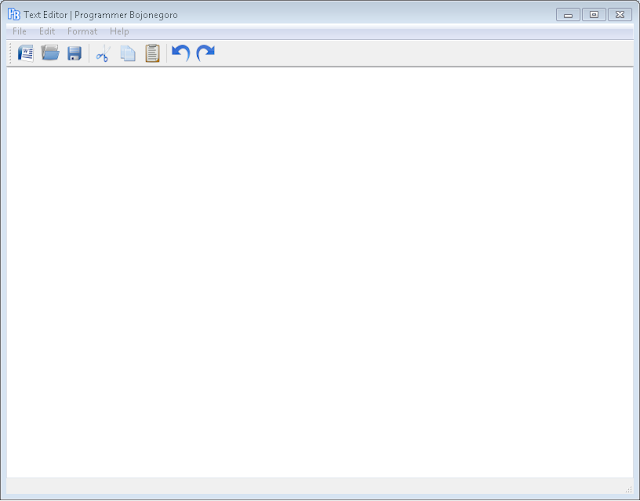
Berikut output yang dihasilkan dari code di atas.
Alhamdulillah, sekian tutorial kali ini. Nantikan contoh-contoh coding lainnya pada postingan-postingan selanjutnya.
Semoga bermanfaat dan menambah wawasan temen-temen semua.
Terimakasih
Apa PySide itu ?
PySide adalah library Python lintas-platform yang dapat digunakan untuk membangun aplikasi GUI dengan memanfaatkan Qt Framework.
Untuk instalasi PySide, baik di Windows, Mac OS maupun Linux silakan cek di https://pypi.python.org/pypi/PySide/1.2.4#installation.
Atau jika masih belum berhasil mengintal PySide, temen-temen bisa mengikuti langkah-langkah mudah mengintal PySide berikut ini:
- Download PySide di https://download.qt.io/official_releases/pyside/. Sesuaikan versi Sistem Operasi dan juga versi Python yang kalian gunakan.
- Install PySide seperti mengintal aplikasi lain di OS kalian masing-masing. Misalnya kalau di windows yaitu tinggal klik dua kali file instalasinya.
Apabila PySide sudah terinstal, maka temen-temen dapat melanjutkan tutorial ini.
Oke, berikut ini adalah contoh coding untuk membuat text editor di Python dengan library PySide.
texteditor.py
# Import required modules
import sys, time
from PySide.QtGui import *
# Our main window class
class MainWindow(QMainWindow):
 # Constructor function
 def __init__(self, fileName=None):
  super(MainWindow,self).__init__()
  self.initGUI()
 def initGUI(self):
  self.setWindowTitle("Text Editor | Programmer Bojonegoro")
  self.setWindowIcon(QIcon('pb.ico'))
  self.setGeometry(100, 100, 800, 600)
  self.textEdit = QTextEdit()
  self.setCentralWidget(self.textEdit)
  self.fileName = None
  self.filters = "Text files (*.txt)"
  self.SetupComponents()
  self.show()
 # Function to setup status bar, central widget, menu bar, tool bar
 def SetupComponents(self):
  self.myStatusBar = QStatusBar()
  self.setStatusBar(self.myStatusBar)
  self.myStatusBar.showMessage('Ready', 10000)
  self.CreateActions()
  self.CreateMenus()
  self.CreateToolBar()
  self.fileMenu.addAction(self.newAction)
  self.fileMenu.addAction(self.openAction)
  self.fileMenu.addAction(self.saveAction)
  self.fileMenu.addSeparator()
  self.fileMenu.addAction(self.exitAction)
  self.editMenu.addAction(self.cutAction)
  self.editMenu.addAction(self.copyAction)
  self.editMenu.addAction(self.pasteAction)
  self.editMenu.addSeparator()
  self.editMenu.addAction(self.undoAction)
  self.editMenu.addAction(self.redoAction)
  self.editMenu.addSeparator()
  self.editMenu.addAction(self.selectAllAction)
  self.formatMenu.addAction(self.fontAction)
  self.helpMenu.addAction(self.aboutAction)
  self.helpMenu.addSeparator()
  self.helpMenu.addAction(self.aboutQtAction)
  self.mainToolBar.addAction(self.newAction)
  self.mainToolBar.addAction(self.openAction)
  self.mainToolBar.addAction(self.saveAction)
  self.mainToolBar.addSeparator()
  self.mainToolBar.addAction(self.cutAction)
  self.mainToolBar.addAction(self.copyAction)
  self.mainToolBar.addAction(self.pasteAction)
  self.mainToolBar.addSeparator()
  self.mainToolBar.addAction(self.undoAction)
  self.mainToolBar.addAction(self.redoAction)
 # Slots called when the menu actions are triggered
 def newFile(self):
  response = self.msgApp("Confirmation","Do you like to save the current file?")
  if response == "Y":
   self.saveFile()
  self.textEdit.setText('')
  self.fileName = None
 def openFile(self):
  response = self.msgApp("Confirmation","Do you like to save the current file?")
  if response == "Y":
   self.saveFile()
   self.fileName, self.filterName = QFileDialog.getOpenFileName(self)
   self.textEdit.setText(open(self.fileName).read())
 def saveFile(self):
  if self.fileName == None or self.fileName == '':
   self.fileName, self.filterName = QFileDialog.getSaveFileName(self, filter=self.filters)
  if(self.fileName != ''):
   file = open(self.fileName, 'w')
   file.write(self.textEdit.toPlainText())
   self.statusBar().showMessage("File saved", 2000)
 def exitFile(self):
  response = self.msgApp("Confirmation","This will quit the application. Do you want to Continue?")
  if response == "Y":
   myApp.quit()
  else:
   pass
 # Function to show Diaglog box with provided Title and Message
 def msgApp(self,title,msg):
  userInfo = QMessageBox.question(self,title,msg,QMessageBox.Yes | QMessageBox.No)
  if userInfo == QMessageBox.Yes:
   return "Y"
  if userInfo == QMessageBox.No:
   return "N"
  self.close()
 def fontChange(self):
  (font, ok) = QFontDialog.getFont(QFont("Helvetica [Cronyx]", 10), self)
  if ok:
   self.textEdit.setCurrentFont(font)
 def aboutHelp(self):
  QMessageBox.about(self, "About Simple Text Editor", "A Simple Text Editor where you can edit and save files")
 # Function to create actions for menus
 def CreateActions(self):
  self.newAction = QAction( QIcon('new.png'), '&New', self, shortcut=QKeySequence.New, statusTip="Create a New File", triggered=self.newFile)
  self.openAction = QAction( QIcon('open.png'), 'O&pen', self, shortcut=QKeySequence.Open, statusTip="Open an existing file", triggered=self.openFile)
  self.saveAction = QAction( QIcon('save.png'), '&Save', self, shortcut=QKeySequence.Save, statusTip="Save the current file to disk",triggered=self.saveFile)
  self.exitAction = QAction( QIcon('exit.png'), 'E&xit', self, shortcut="Ctrl+Q", statusTip="Exit the Application", triggered=self.exitFile)
  self.cutAction = QAction( QIcon('cut.png'), 'C&ut', self, shortcut=QKeySequence.Cut, statusTip="Cut the current selection to clipboard", triggered=self.textEdit.cut)
  self.copyAction = QAction( QIcon('copy.png'), 'C&opy', self, shortcut=QKeySequence.Copy, statusTip="Copy the current selection to clipboard", triggered=self.textEdit.copy)
  self.pasteAction = QAction( QIcon('paste.png'), '&Paste', self, shortcut=QKeySequence.Paste, statusTip="Paste the clipboard's content in current location", triggered=self.textEdit.paste)
  self.selectAllAction = QAction( QIcon('selectAll.png'), 'Select All', self, statusTip="Select All", triggered=self.textEdit.selectAll)
  self.redoAction = QAction( QIcon('redo.png'),'Redo', self, shortcut=QKeySequence.Redo, statusTip="Redo previous action", triggered=self.textEdit.redo)
  self.undoAction = QAction( QIcon('undo.png'),'Undo', self, shortcut=QKeySequence.Undo, statusTip="Undo previous action", triggered=self.textEdit.undo)
  self.fontAction = QAction( QIcon('font.png'),'F&ont', self, statusTip = "Modify font properties", triggered = self.fontChange)
  self.aboutAction = QAction( QIcon('about.png'), 'A&bout', self, statusTip="Displays info about text editor", triggered=self.aboutHelp)
  self.aboutQtAction = QAction(QIcon("aboutQt.png"), 'About &Qt', self, statusTip="Show the Qt library's About box", triggered=qApp.aboutQt)
 # Actual menu bar item creation
 def CreateMenus(self):
  self.fileMenu = self.menuBar().addMenu("&File")
  self.editMenu = self.menuBar().addMenu("&Edit")
  self.formatMenu = self.menuBar().addMenu("F&ormat")
  self.helpMenu = self.menuBar().addMenu("&Help")
 def CreateToolBar(self):
  self.mainToolBar = self.addToolBar('Main')
if __name__ == '__main__':
 # Exception Handling
 try:
  myApp = QApplication(sys.argv)
  mainWindow = MainWindow()
  myApp.exec_()
  sys.exit(0)
 except NameError:
  print("Name Error:", sys.exc_info()[1])
 except SystemExit:
  print("Closing Window...")
 except Exception:
  print(sys.exc_info()[1])
note: copy dan simpan code di atas dengan ekstensi nama_project.py.
Berikut output yang dihasilkan dari code di atas.
Alhamdulillah, sekian tutorial kali ini. Nantikan contoh-contoh coding lainnya pada postingan-postingan selanjutnya.
Semoga bermanfaat dan menambah wawasan temen-temen semua.
Terimakasih


0 Response to "Cara Membuat Text Editor Di Python Dengan Library PySide"
Posting Komentar